
Are you a proud owner of a Shopify store looking to add a personal touch to your online shop? Changing the typefaces is a great approach to make your store stand out. Custom typefaces may give your store a distinctive and attention-grabbing appeal that will help buyers remember it longer. Integrate distinct fonts by following our lead into your Shopify platform. Simple and easy to understand, these steps are available to both beginners and technology enthusiasts.
Why Customize Fonts in Shopify?
Business success hinges on selecting the right fonts for your store’s image.
Evoking specific emotions, they set the tone for a brand. When you customize fonts, you have the freedom to align your store’s design with your brand personality. Here are a few compelling reasons to consider customizing fonts in your Shopify store:
Brand Consistency: Custom fonts allow you to maintain consistency in your branding across all platforms. Whether it’s your website, social media, or marketing materials, using the same fonts reinforces your brand identity.
Unique Appearance: Custom fonts help your store stand out in the crowded eCommerce landscape. Your store becomes instantly recognizable, leaving a lasting impression on visitors.
Improved Readability: Carefully chosen fonts enhance the readability of your content. When visitors can easily read and understand your product descriptions and information, they are more likely to make a purchase.
Visual Appeal: Fonts can significantly impact the visual appeal of your store. The ideal typefaces will make your website appear either professional, trendy, or fun, according to your company’s tone.
Adding Custom Fonts to Shopify
Explaining how to add custom fonts, let’s start. We’ll keep everything simple and understandable:
Step 1: Choose Your Custom Fonts
Custom fonts require selecting the desired ones beforehand. There are numerous font libraries available online, both free and paid. Popular choices are among them Google Fonts, Adobe Fonts, and Font Squirrel. Browse through these libraries and select the fonts that align with your brand’s personality.
Step 2: Download Your Chosen Fonts
Once you’ve selected your custom fonts, you’ll need to download them to your computer. Most font libraries provide download options, usually in the form of ZIP files. After downloading, extract the font files to a folder on your computer.
Step 3: Convert Fonts (If Necessary)
Some custom fonts may come in formats that are not compatible with Shopify. If that’s the case, you may need to convert the fonts to web-friendly formats like TTF, OTF, WOFF, or WOFF2. Resources like font conversion programs can help you through this process, there are numerous online.
Step 4: Upload Fonts to Shopify
Now, it’s time to upload your custom fonts to your Shopify store. Follow these steps:
a. Login to the Shopify admin interface.
b. Navigate to “Online Store” and select “Themes.”
c. In the “Actions” dropdown, choose “Edit Code.”
d. Locate and open your theme’s “Assets” folder.
e. Click on “Add a new asset” and upload your custom font files.
f. Once uploaded, remember the file names as you’ll need them in the next step.
Step 5: Modify Your Theme’s CSS
To use your custom fonts, you need to modify your theme’s CSS (Cascading Style Sheets). You don’t need to be an expert in coding for this, so don’t worry. Follow these steps:
a. In the “Edit Code” section, locate and open your theme’s “theme.scss.liquid” or “stylesheet.css.liquid” file.
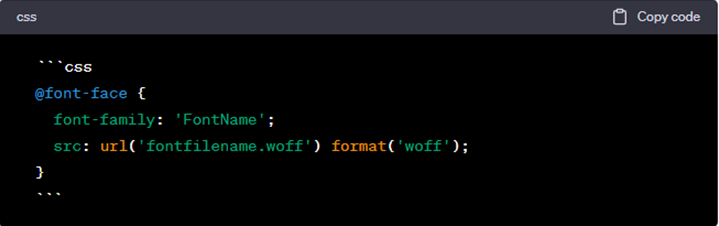
b. Add the following CSS code to the file, replacing ‘FontName’ with your actual font name and ‘fontfilename’ with the file name of your font:
c. Save the changes.
Step 6: Apply Custom Fonts to Your Store
Now that your fonts are uploaded and added to your theme’s CSS, it’s time to apply them to your store’s elements, like headings, body text, and buttons. Follow these steps:
a. In your theme’s “Edit Code” section, locate and open your theme’s “theme.liquid” file.
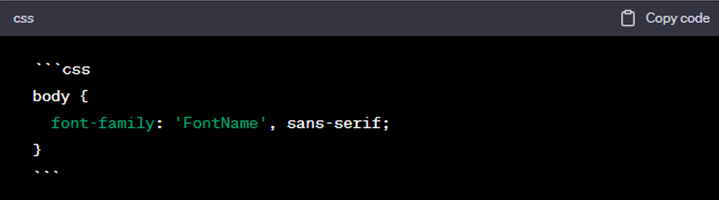
b. Add the following CSS code within the <style> tags:
c. Save the changes.
Step 7: Preview and Publish
Following modification, assessing how custom fonts appear is vital. Go to the “Themes” section, click “Customize”, and navigate through your store to see how your new fonts look.
Once you’re satisfied with the changes, click “Publish” to make them live on your Shopify store.
Conclusion
Fostering brand recognition through customized fonts, unique shopping experiences are delivered. Regardless of being a technical whiz, you can provide your internet shop with a contemporary and tailored appearance by adhering to these guidelines. If you encounter any challenges during this process, don’t hesitate to reach out to Shopify web developers or consider custom eCommerce website development services to assist you in achieving your desired font customization. Remember, a well-designed and customized store can leave a lasting impression and drive more sales.
If you arе also looking “How to Fix Shopify Checkout Not Working Issue“, thеn you should rеad this blog to know morе by clicking on thе link


1 Comment
Comments are closed.